Friday, September 25, 2009

Scrap Happy


I love to stamp and I love to scrap, but I really haven't stamped images for many of my scrapbook pages.  This layout on Katherine's prom dress though just cried out for the Fifth Avenue Floral set - I thought the roses would be a great match for the ones on her dress.


Using Chocolate Chip, So Saffron and Baja Blue, I stamped the rose four times in each color.  The bottom layer of each rose uses the full image.  For each succeeding layer, I trimmed some of the petals away and used dimensionals to pop up the layers.  I stamped on SU! white cardstock and sponged on my color for each layer.  I finished by embellishing with some colored pearls.

Thursday, September 24, 2009

Flowers from a friend... Auntea Suzz!


I have "known" my fellow stamper Suzanne Bompensa for more than nine years, and I finally got to meet her in person this past weekend when stampers from Florida, Michigan, Delaware, Alabama and South Carolina all converged here in my hometown to spend some time together doing what we love.  There were ten of us total, and Suzanne made each of us a gift set.  This is the first part of the set - each of the flowers is a spool of ribbon.


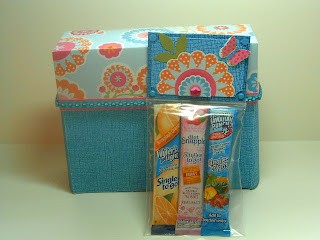
Inside the bag was this little matchbox die set of drawers.  Inside each drawer, and matching the color of each drawer, were flowers and a tiny package of Flower Soft.  But that's not all.  Oh no... if it were, anyone could have churned out nine of these.  But Suzanne is not just anyone, and she was far from finished.


There were also two packages, one containing these powdered drink mix-ins for our water, and the other one containing the Deluxe M&M's which my daughter has already eaten.  (sorry).  And then there was this box.


And inside that box, there was:

a pen
a binder clip
a notebook
two post it pads
three tea bags
an embellished paper clip
four mini note cards with envelopes
four standard sized cards with embossed envelopes

and...
each of the cards opened in a different way, and was lavishly embellished.
Why?
Because that's how Auntea Suzz rolls.
Love you, Suzz!

Wednesday, September 23, 2009

Feelin' a little punchy...


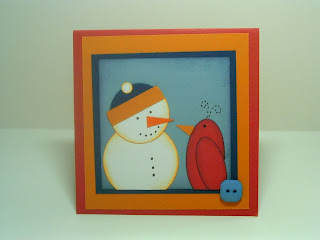
Here's a card we did at stamp club this past month.  I have been seeing SO many punch art creations lately and it was fun to actually do one.  I have been told by my upline that this bird is a cardinal.  I told her that if cardinals were that big, I would have a heart attack if I actually saw one.  I think it's a red penguin.

Tuesday, September 22, 2009

Just another embellishment opportunity...


Have you heard the old saying that there are no mistakes in stamping; just embellishment opportunities?  That was the situation with this card. I wanted the flowers to be a pretty greenish rust color (like an orchid) but they ended up looking really awful.  Of course they were the last part of the image I colored, so I didn't want to scrap the whole project.  Fortunately, I found these tiny flowers in my stash and they were a perfect fit.  I stamped the pillow onto DSP, cut it out and adhered it to the card for a little extra detail.  Hope you like it!

Sunday, September 13, 2009

Country Morning, Take Two

Here's another card from the Country Morning set - have I mentioned that I love this set?  Partly because it's so darned cute, and partly because it got  me out of a real dry spell in terms of stamping.  I hadn't picked up a stamp in longer than I care to say, except once a month at club.  This set really made me want to sit down and make some cards.

I started with a standard size card (4 1/2 x 5 1/2") made from Night of Navy CS.  Over that is a layer of patterned paper from the Pattern Pack DSP III - a Level One hostess set, also in Night of Navy.  I wanted a worn look for this card, so I crumpled the patterned paper and sanded the edges before applying it to the card base with my Two Way glue pen.

I stamped my image in black Staz-On ink on watercolor paper, and colored it with my markers and blender pen.  I cut it out with my circle cutter and layered it on a mega-sized scalloped circle (punch and circle cutter available at your LCS).  The scalloped circle is also from the Pattern Pack III - there are such great colors in this pack - I'm really glad I got it.

I mounted the scalloped circle onto textured Really Rust cardstock that I sponged with Chocolate Chip ink and distressed with my acrylic nails (available at your local manicurist).  You could use your distressing tool, but I like to use what I have on hand, so to speak!

The sentiment used here is part of the "Yummy" set, and I used my Stamp-A-Ma-Jig to make sure I got it in exactly the right place.  I framed it out with some of the vanilla Hodgepodge Hardware (a recent offering in my SUSHARES group), and added a ribbon in  Soft Suede Polka Dot grosgrain (also a SUSHARES featured item).  The rust panel is mounted with Stampin' Dimensionals to give it a little more interest.

Happy Stamping!

Peace Within (at last!)

How ironic that this set is called Peace Within, when the darned thing took me over an hour to finish, and I ripped it apart about four thousand times.  If you're ever tempted to just chuck a half-finished card in the trash, you know where I was coming from.  However, I had already used some of my precious rub-ons on it, and there was no way I was going to waste those, because I am just too cheap.
 
This card started out as a standard 4 1/4 x 5 1/2" card, and now, in it's finished state, measures 3 1/2" wide and 3 3/4" tall.  Yes, the Incredible Shrinking Card, indeed.  As I have said before, when I don't like something, I tend to just whack it off until I do, or until the card disappears entirely.
 
The card base is Very Vanilla, and the image is also stamped on VV rather than Watercolor Paper.  I just didn't want the extra texture.  Keep in mind when you do this, that you can't work your colors as much on this paper as you can on the Watercolor Paper, or you'll tear up the cardstock.  I know this from experience.  I colored the image with my SU! markers and blender pen.
  
The image is mounted on a piece of Bordering Blue cardstock.  One end of the blue layer has been punched with the Scallop Edge punch, and the other end has had a rub-on from the Dots & Designs collection (a recent SUSHARES item) applied.  The rub-on is white, which was a little stark, and didn't really go well with the vanilla cardstock.  To tone it down a bit, I used a sponge and my Stampin' Pastels chalks.  Did you know you could do that?  Well, you can!  Just apply directly over the rub-on with a dauber, sponge or cotton ball and then wipe over it with a clean part of your applicator to remove the extra chalk from your cardstock.  Works great with all white rub-ons.
 
A little bit of Vanilla Taffeta Ribbon finishes off this card.  (And in case you were wondering, yes I did try to put the jars of flowers image from the last post on this card. What was I thinking?  See, I knew you'd say that!)

Country Morning

Hi, guys!  Welcome to my first post on the Everyday Stamper blog.  I'm hoping to get projects posted here more regularly and even to try to do some videos if you all can tolerate them.  First though, here's a card I whipped up the other day using the Stampin' Up! set "Country Morning".  It's a Level One hostess set and I absolutely love it, partly because it makes me think of my friend Heather.

The card base (folded) measures 4" high by 4 1/4" wide, which means I started out with a piece of cardstock measuring 8 1/2" x 4" in More Mustard.  The image is stamped in Staz On black on watercolor paper 2 1/4" wide by 2 3/8" high.   If you'd like to see a larger image, just click on the picture.

By the way, these crazy measurements are caused by me eyeballing everything and just whacking it down to size if I think it's too big.  This means that I never know exactly how big any given card will be until I'm done with it. (Wow - that's going to play well in my videos!) I tore this one apart several times, and the image that's on it actually started out on a completely different card that you will see in another post. You'll wonder why I ever thought this image might work on that card.  But, I digress.. back to the card.

The image was colored with my Stampin' Up! markers and the blender pen - boy, do I love those blender pens!  Colors used are:  Creamy Caramel, Bordering Blue, Old Olive, More Mustard, So Saffron and Pixie Pink.  After coloring, I layered the image on a piece of Cameo Coral cardstock, and then layered that onto a piece of Mellow Moss.  Behind the Mellow Moss, I used the scallop punch on a piece of paper from the Prints Sampler 6" x 6" pack (which is probably retired because I have had it forever, but you can substitute the patterned DSP of your choice).  I used the 1/16" punch to pierce each of the scallops.

Then I tried to find some ribbon to go on this card.  And I tried and tried.  Nothing looked right.  I liked the "feel" of the 3/8" Taffeta Ribbon, but none of the colors really worked.  SO, I took a length of the Very Vanilla Taffeta Ribbon and colored it with my More Mustard marker to make my very own custom-colored ribbon.  I did not heat set it; it dried pretty quickly and didn't seem to need it.  I tied it around the card with a simple knot, trimmed the edges, and hey, Bob's your Uncle - it was done.  (If you have never heard the phrase "Bob's your Uncle" (it just occurred to me that you might not have), go look it up on Wikipedia.)

So, to all of my SUSHARES ladies, and to Tamaya, who thinks I am a big ole hoarder, I certainly am using my stuff, and so should you!  No hoarding!

Followers